- Demo DOWNLOAD
- GeeXLab Downloads
- Forum thread (EN) for feedbacks / bug-reports
- Tip: How to run a demo with GeeXLab?
GeeXLab 0.28.0.0 is available and comes with the support of NVIDIA FleX physics engine. In a word(s), FleX is a particle-based physics simulation library. Particle is everything in FleX world.
FleX is a particle based simulation technique for real-time visual effects.Traditionally, visual effects are made using a combination of elements created using specialized solvers for rigid bodies, fluids, clothing, etc. Because FleX uses a unified particle representation for all object types, it enables new effects where different simulated substances can interact with each other seamlessly. Such unified physics solvers are a staple of the offline computer graphics world, where tools such as Autodesk Maya’s nCloth, and Softimage’s Lagoa are widely used. The goal for FleX is to use the power of GPUs to bring the capabilities of these offline applications to real-time computer graphics.
You can find more information about FleX on the homepage (hey NV, you should add GeeXLab to the list of engines supported by FleX 😉 ).
Unlike PhysX 3 or PhysX 4 which support both CPUs and GPUs, FleX is a GPU only engine based on CUDA. FleX is also available with a Direct3D support. But in GeeXLab, only the CUDA support is available. That makes easier the coding of the FleX plugin on Windows and Linux. The FleX plugin for GeeXLab supports both Windows and Linux. But in the current version of GeeXLab (0.28.0), only the Windows version is operational. I faced some linking issues on Linux and then I decided to not provide the plugin on Linux. I hope to fix the linking problem as soon as possible.
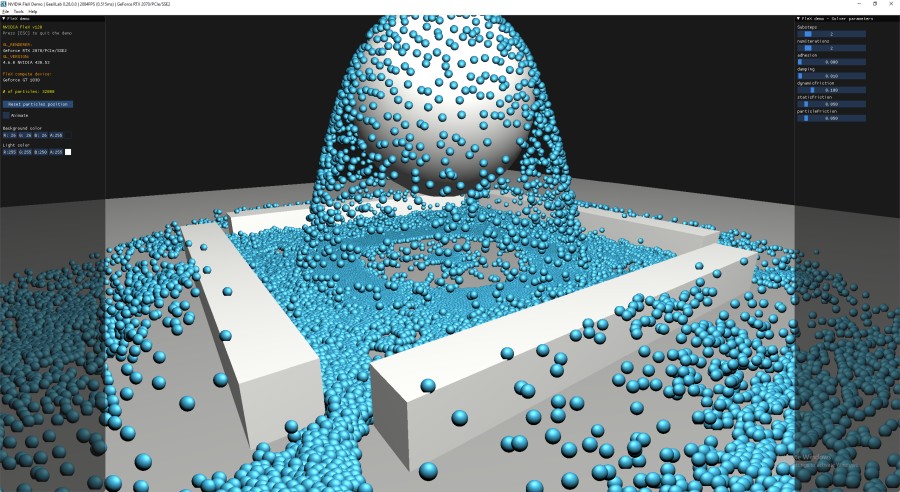
The demo:
Let’s look at the main functions of FleX used in the GeeXLab demo.
Here is the FleX initialization code in the demo (Lua code):
-- 1/ select the FleX/PhysX accelerator ----------------
--
gh_flex.set_device_index(-1)


-- 2/ Start FleX. ---------------------
--
flex_initialized = gh_flex.start()
if (flex_initialized == 1) then

  -- 3/ Get some info from FleX.
  --
  flex_version = gh_flex.get_version()
  flex_compute_device = gh_flex.get_compute_device_name()


  -- 4/ FleX solver creation. -------------------
  --
  local max_particles = num_vertices
  flex_solver = gh_flex.solver_create(max_particles)


  -- 5/ FleX particles creation --------------------
  --
  flex_particles = gh_flex.particles_create(num_vertices)

  flex_init_particles()

  -- Upload particles to GPU.
  gh_flex.solver_write_particles(flex_solver, flex_particles)


  -- 6/ Collision shapes ------------------------------
  --
  local num_shapes = 5 --  1 sphere + 4 boxes
  flex_shapes = gh_flex.shapes_create(num_shapes)

  flex_init_collision_shapes()

  -- Upload collision shapes to GPU.
  gh_flex.solver_write_shapes(flex_solver, flex_shapes)


  -- 7/ Solver parameters ---------------------
  --
  flex_update_solver_params()


  -- 8/ Runs a first simulation -------------------
  --
  flex_run_simulation(0.016)


else

  print("Unable to initialize FleX !!!")

end
Let’s detail a bit the init code:
- we select the FleX GPU with gh_flex.set_device_index(). The value -1 allows to auto-select the default PhysX device (see NVIDIA control panal, PhysX section).
- we start the FleX engine. If a CUDA-capable GPU is found by FleX, the start() function should return 1.
- optional: we can retrieve the name of the FleX computing device that has been selected.
- we can now create a solver using gh_flex.solver_create(). Several solvers can be created if required. The solver can be seen as the physics processor: it computes a simulation step.
- we create a set of particles which is more or less a set of buffers that maintain the different properties of particles. In GeeXLab 0.28.0, position, velocity and phase of particles are included in a particle set. Once a set of particles is created, we can initialize particles properties using flex_init_particles(). The definition of flex_init_particles() can be easily found in the INIT script.
- after particles, we can now create some collision shapes. GeeXLab 0.28.0 supports the following shapes: sphere, box and mesh. The mesh shape is cool because it can be any mesh. Just create a mesh (using gh_mesh.create_torus() for example) and use it as a collision shape. We create a set of collision shapes using gh_flex.shapes_create(). Once a set of shapes has been created, just add shapes in the set using gh_flex.shapes_set_sphere(), gh_flex.shapes_set_box() or gh_flex.shapes_set_mesh().
- one of the last steps of FleX’s initialization is the solver parameters. The solver has a lot of parameters that control various aspects of the simulation like the gravity, the wind, dynamic/static friction, damping, viscosity, number of iterations, and so on. Several functions are available to set the solver parameters depending on their type: gh_flex.solver_set_param_1f(), gh_flex.solver_set_param_3f(), gh_flex.solver_set_param_1i().
- the last step, is to run a simulation step with gh_flex.solver_update().
Most of the FleX simulation code is present in the INIT script.
In the FRAME script, we have to perform the following steps:
- copy the position of particles from FleX position buffer to our vertex buffer using gh_flex.particles_copy_to_vb().
- run a simulation step using gh_flex.solver_update().
- retrieve particle position and velocity from FleX (with gh_flex.solver_read_particles()). This step prepare particle data for step 1.
NVIDIA recommends to update the solver as far as possible from the copy of FleX buffers to rendering buffers (because of the asynchronous nature of the solver). That’s why in the demo, I call gh_flex.solver_update() at the end of the FRAME script while the synchronization between FleX buffers and our vertex buffers is done at the beginning of the FRAME script.
All concrete details are in the demo (init.lua and frame.lua).
In the demo, 32000 particles are initialized in a 3D grid and dropped on a shpere:


